





Removing the app takes two short windows. One box in the second decides what stays on your computer afterward.
Uninstalling
You remove CapyWatcher the way you remove any Windows program, from Windows’ Settings. It takes two short windows: an optional question, then the removal with one choice about your data.
Start the uninstall
- Open the Start menu and select Settings.
- Select Apps, then Installed apps. On Windows 10, it’s Apps, then Apps & features.
- Find CapyWatcher in the list, select the … button beside it (on Windows 10, select CapyWatcher itself), then Uninstall, and Uninstall again to confirm.
- Windows may ask whether to allow the app to make changes. Select Yes: removing the app’s service needs administrator rights, the rights Windows keeps for changes to the whole computer.
Control Panel works too: Programs, then Programs and Features, then double-click CapyWatcher.
The question: why are you uninstalling it?
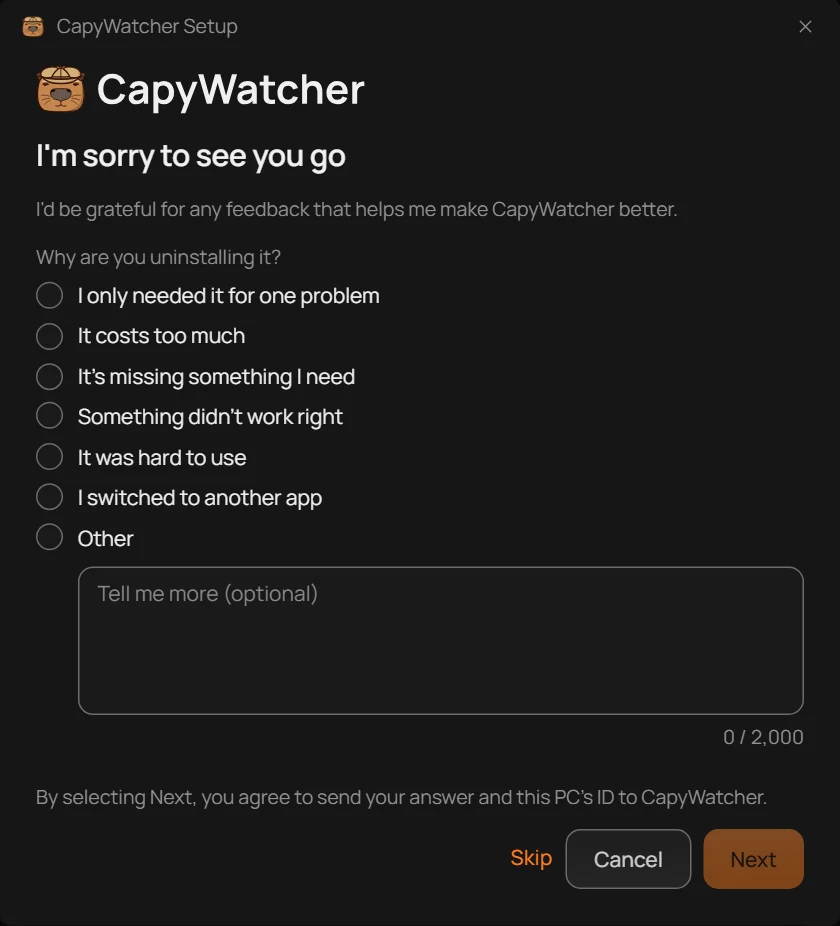
The first window asks why you’re leaving. Answering is up to you.
- The reasons
- Next
- Skip
- Cancel
- What Next sends
- To answer, choose a reason (1). Under Other, you can write more in your own words, up to 2,000 characters. Then select Next (2).
- To answer nothing, select Skip (3).
- To keep the app, select Cancel (4).
The line above the buttons (5) says “By selecting Next, you agree to send your answer and this PC’s ID to CapyWatcher.” Your answer is the reason and the text you typed. This PC’s ID is the ID the app made for its license, not the computer’s name. With Skip, nothing is sent. The answer goes when you select Remove in the next window: Cancel there sends nothing either.
Remove the app
- Also delete my settings and history
- Remove
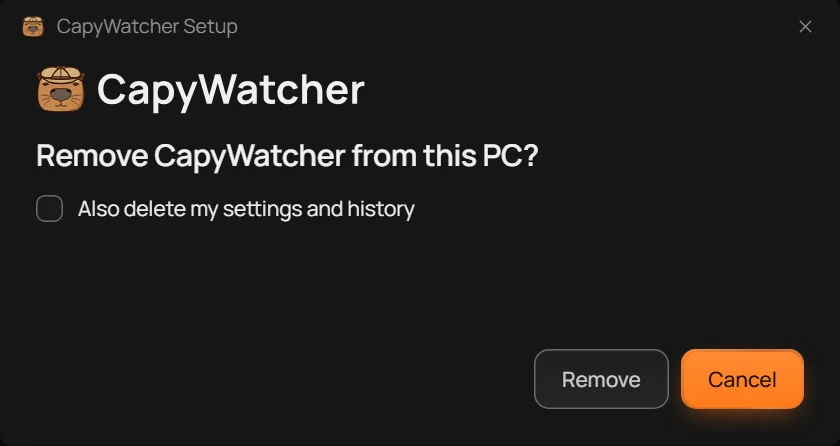
The second window asks “Remove CapyWatcher from this PC?”.
- Leave Also delete my settings and history (1) unchecked to keep them for a later install, or check it to remove them too: see What stays on your computer.
- Select Remove (2).
- The window shows its steps, then “CapyWatcher is removed.” With the box unchecked, it adds where your settings and history stay.
Every locked folder is unlocked as the app goes, and the CapyWatcher entries leave File Explorer’s right-click menu. Your own files aren’t touched.
Installed with the .msi
If the app was installed with the .msi, the package companies use, Settings removes it with no window: no question, nothing sent, and your settings and history stay. An IT department can do the same for many computers with Windows Installer.
Important
Uninstalling doesn’t end your license, and it doesn’t give a new trial: install the app again on this computer, and it keeps the trial it had. With a license, enter your key again if the app asks for it.
What stays on your computer
Uninstalling always removes the app itself. What happens to your settings and History depends on one box in the uninstall window, Also delete my settings and history: see Uninstalling.
What always goes
- The app’s files in its install folder, usually
C:\Program Files\CapyWatcher. - The app’s service, which recorded new files.
- The CapyWatcher entries in File Explorer’s right-click menu, the Start menu shortcut and the startup entry.
- Every lock the app put on a folder: each locked folder is unlocked before the app goes.
Your own files stay where they are. Nothing the app recorded deletes or moves them.
With the box unchecked
Your settings and History stay in C:\ProgramData\CapyWatcher, and the last window says “Your settings and history stay in C:\ProgramData\CapyWatcher.” with that path. The folder holds:
- your settings: the tracked folders, delete alerts, locks you had set, hidden processes and every option;
- History, the record of who created your files;
- the license file;
setup.log, the record of each install, update and removal.
Install CapyWatcher again on this computer, and it picks them up: History shows the files it recorded before, and the app records new files again from the moment it’s back. Files created while it was uninstalled are never recorded.
ProgramData is a hidden folder. To open it, type C:\ProgramData\CapyWatcher in File Explorer’s address bar.
With the box checked
The whole C:\ProgramData\CapyWatcher folder goes, with your settings, History, the license file and setup.log, and the key the app used to encrypt History. A copy of History made earlier can’t be read again after that.
If you moved History to another folder in Options, that folder isn’t removed: delete it yourself if you want it gone.
What the license server keeps
The license server keeps your free trial and your license, tied to an ID the app made for this computer, not to the computer’s name. That’s why installing again on the same computer doesn’t start a new trial. With a license, the computer keeps its place among your key’s computers until you remove it in Help, from another computer, or until it goes 60 days without a check: see Your license and its computers.
Important
Deleting your settings and history can’t be undone: History can’t be brought back, even by installing the app again.