





Once History shows the files you want, act on them: one row at a time from its menu, several at once by selecting them, or a whole program by hiding it.
A file’s menu
Each row of History has a menu with what you can do with that file. Right-click the row to open it, or point at the row and select the button with three dots at its right end.
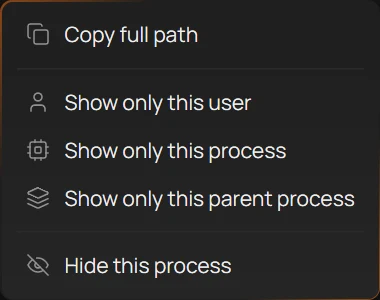
- Copy full path
- Show only this user
- Show only this process
- Hide this process
What each item does
- Copy full path (1) copies the file’s path, such as
C:\Users\Work\Documents\notes.txt, ready to paste. - Open file location opens the file’s folder in Explorer, with the file selected. Pressing Enter on a row does the same.
- Show only this user (2) sets History’s User list to the row’s user, so the list shows only that account’s files.
- Show only this process (3) does the same with the Process list: every file this program created, and nothing else.
- Show only this parent process does it with the Parent process list: every file made by the programs this one started.
- Hide this process (4) takes the program’s files out of History, without stopping their recording. See Hiding a noisy program.
The three Show only items set the same lists as the filters above the table, explained on Filtering the list. Clear filters sets them back.
Why an item is missing
The menu shows only what can work for that row:
- Open file location is missing when the file was removed: deleted, moved out of your tracked folders or sent to the Recycle Bin. The app checks again when the menu opens, so a file deleted a moment ago counts too. The picture shows a removed file’s menu.
- A Show only item is missing when its value is unknown, such as a parent process that wasn’t found.
After the free trial, without a license, the Show only items and Hide this process are greyed out, since the program’s columns are hidden until you enter a license key.
Tip
To copy the paths of several files at once, select their rows and press Ctrl+C: see Selecting and copying rows.
Selecting and copying rows
In History, you can select several rows at once and copy them in one go: their paths, to paste into a note or a command, or the whole rows, to paste into a spreadsheet.
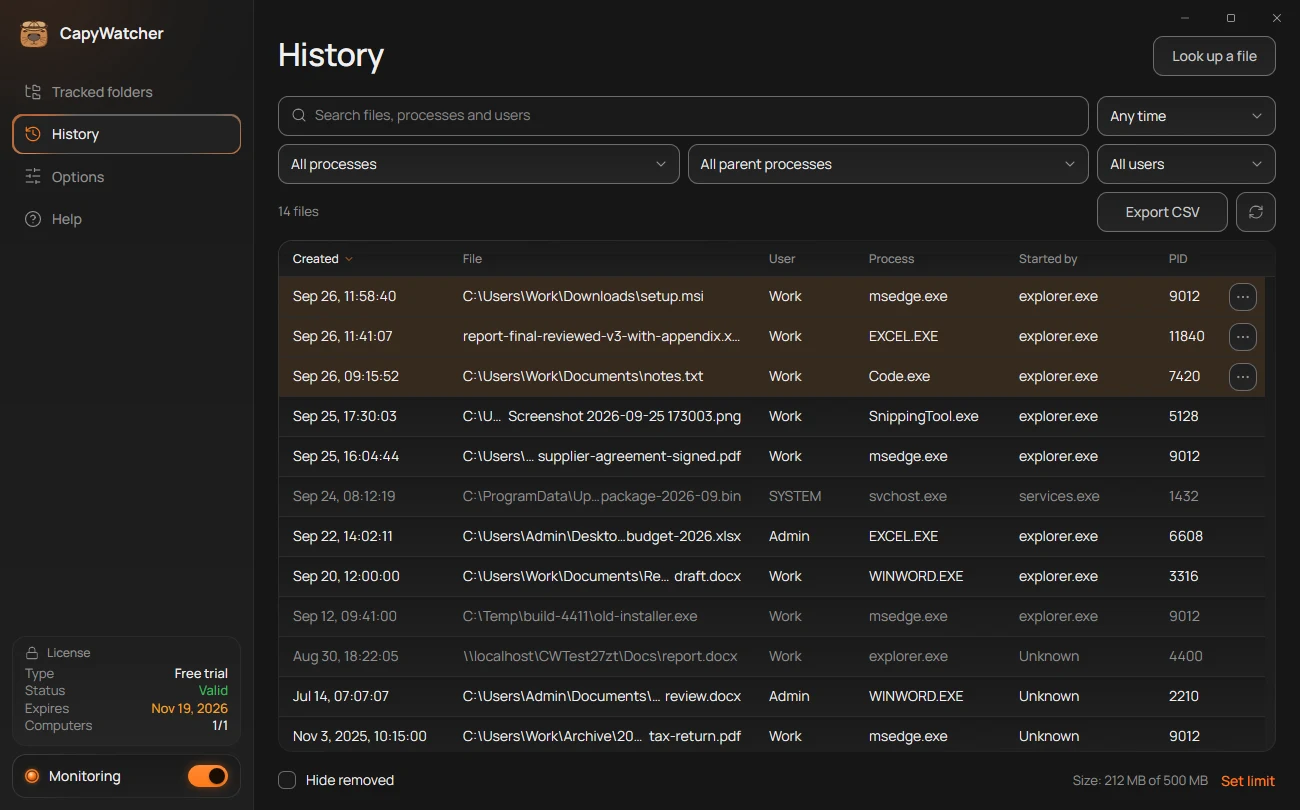
- The selected rows
- A row’s menu button
Select rows
History selects rows the way Explorer selects files:
- Click a row to select it alone.
- Ctrl+click adds a row to the selection, or takes it out.
- Shift+click selects every row from the one you selected first to the one you click.
- Press on a row and drag up or down to select every row you pass. Near the top or bottom of the table, the list scrolls on its own, faster the further you go.
- From the keyboard, Shift with the Up or Down arrow, Page Up or Page Down extends the selection.
Selected rows are highlighted (1). Press Esc to clear the selection. A new search, filter or sort clears it too.
Copy what you selected
- Ctrl+C copies the selected rows’ paths, one per line, in the list’s order.
- Ctrl+Shift+C copies the selected rows as CSV, with the same columns as Export CSV: File, Process, Started by, Parent processes, PID, User and Created. Paste them into Excel or another spreadsheet, and each value lands in its own column.
Ctrl+Shift+C works for a single row too, when you want one record with every detail.
The app confirms the copy to screen readers, such as “3 paths copied.”, and shows nothing on screen.
A row’s own menu
Each row’s menu button (2), and a right-click, open the menu for that one row, even with several selected. Its Copy full path copies only that row’s path. See A file’s menu.
Tip
To copy every row a filter shows, not just a few, export them instead: Exporting history saves them all to a CSV file.
Hiding a noisy program
A build tool or an AI agent can make thousands of files in a project folder, such as cargo.exe or node.exe, and bury the files you’re looking for. Hiding the program takes its files out of History, and nothing is lost: the app still records them, and the right-click answer still names it.
Hide a program
- In History, right-click a row of the program, or select the row’s button with three dots.
- Choose Hide this process.
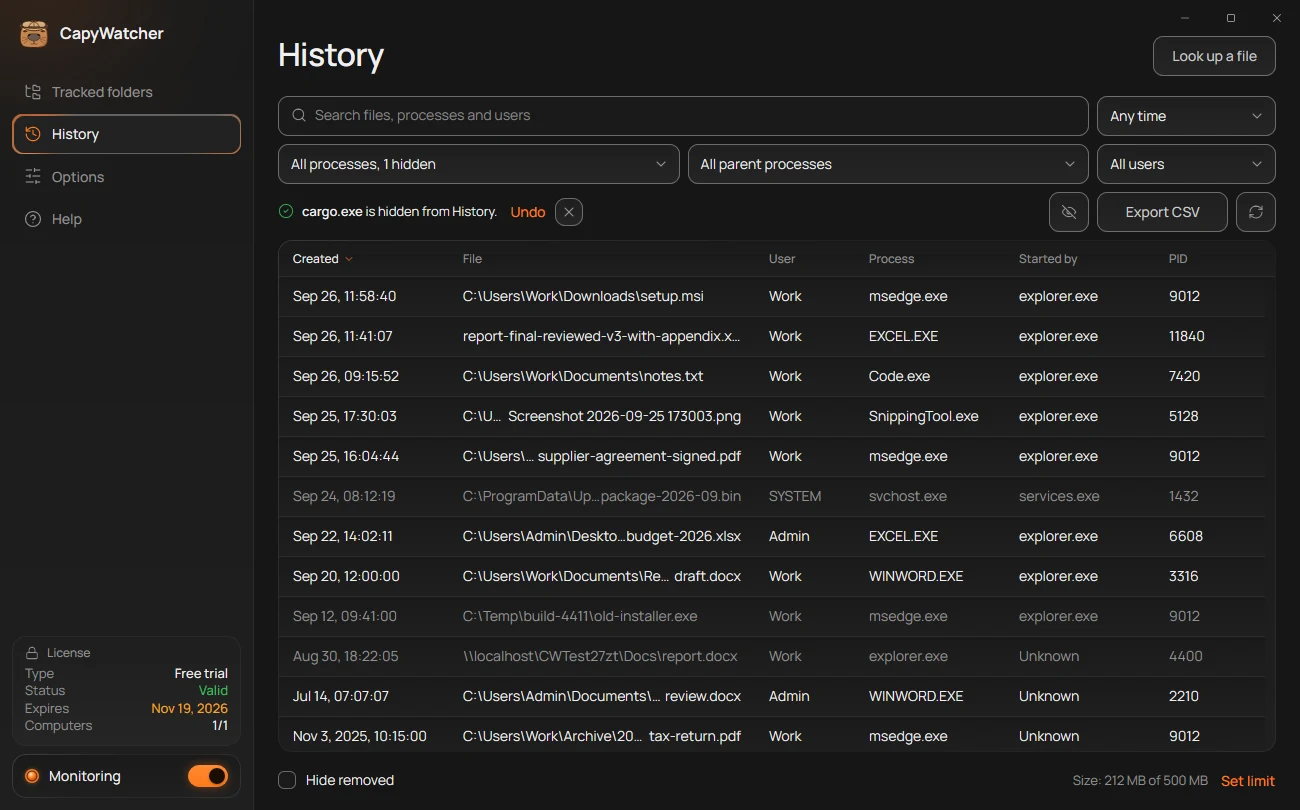
Every file of that program leaves the list, and the count drops. The message (1) confirms it, as in “cargo.exe is hidden from History.”, with the program’s name. Select Undo (2) to bring it back at once.
The program is matched by its name, so every copy of it is hidden, wherever it runs from.
See what’s hidden
While a program is hidden, History shows it in two places:
- The process list reads “All processes, 1 hidden” (3), with the number of programs hidden. Hidden programs aren’t in the list.
- A button with a crossed eye ((4)) appears next to Export CSV. Select it to see the hidden programs, each with a Show button.
The hidden programs stay hidden after Clear filters, since hiding isn’t a filter.
Show a program again
Select Show next to its name, in the window that the crossed eye opens or in Options, where the same list sits in the Hidden processes card:
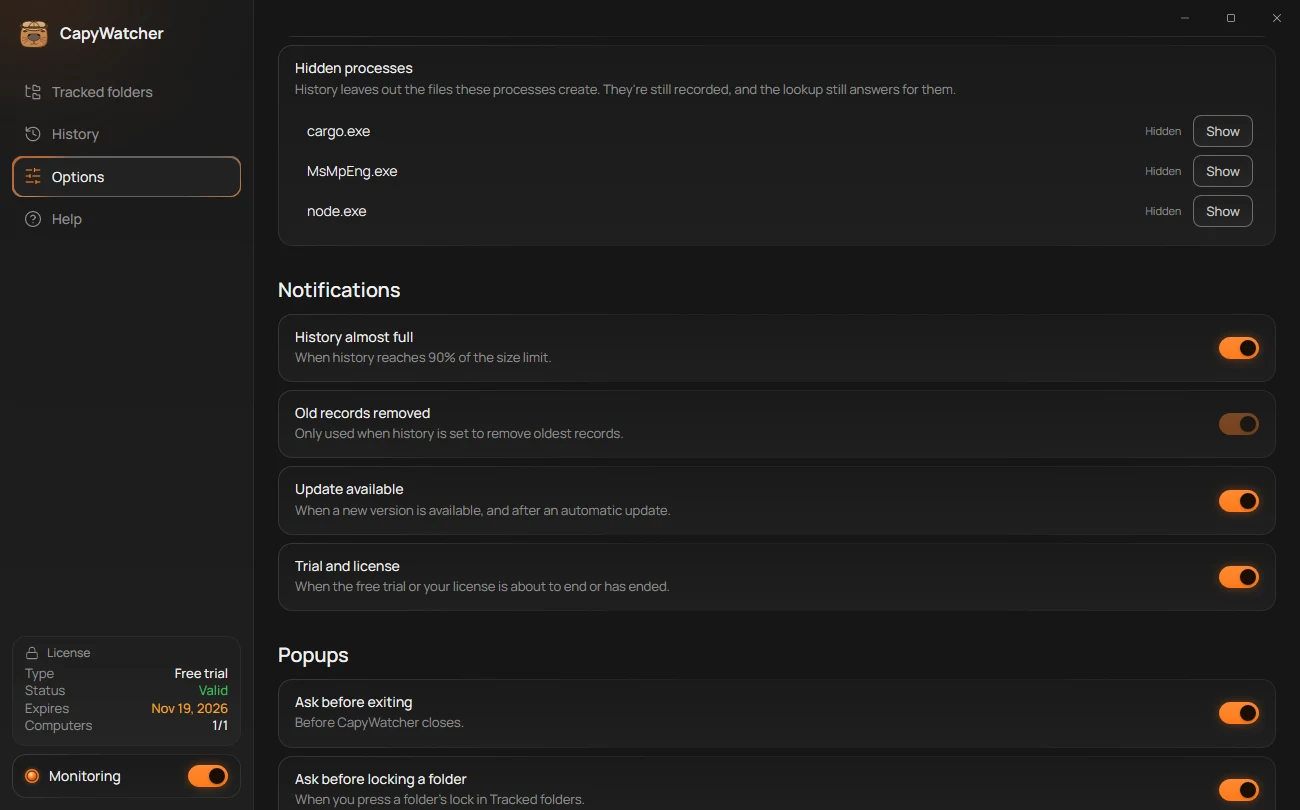
After Show, the row reads Shown and its button Hide, in case you change your mind. The program’s files are back in History at once, the ones made while it was hidden included.
As the card says (3), “History leaves out the files these processes create. They’re still recorded, and the lookup still answers for them.” With nothing hidden, the card explains how to hide one.
What hiding changes, and what it doesn’t
- History leaves the program’s files out of the table, the count, the process list and Export CSV.
- The answer in Explorer’s right-click menu still names the program: see Who created this file?. Its Show in History link is greyed out, with the tooltip “cargo.exe is hidden from History. Show it again in Options.”
- Recording goes on as before, so the program’s files are counted in Files per folder and its deletes still raise delete alerts.
The list is saved with your settings, so it stays through updates and moves with an Options settings backup.