





Everything starts with 7 free days. After that, a license key shows who created every file again, and you enter it in the app.
The free trial
CapyWatcher starts a 7-day free trial the first time it runs on a computer. Everything works during it, with no card, no email and no account. When it ends, the app keeps recording, and a license shows who created every file it recorded, the trial’s included.
During the trial
The trial counts 7 days from the first start, by the license server’s clock, so changing the computer’s date doesn’t change it. Uninstalling and installing again doesn’t start a new trial: the computer keeps the one it had.
The License box at the foot of the main window’s left column shows Free trial as its type and the day it ends under Expires. Help shows the same, with “Free trial. 3 days left.” and two buttons, Buy a license and Enter key.
The day before the last day, a notification says “Your free trial ends tomorrow.” The switch Trial and license in Notifications and popups turns these notices off.
When the trial ends
A notification says “Your free trial has ended.” and “Monitoring still records new files. A license shows who created them.”
Monitoring goes on: the app still records every new file in your tracked folders, with its program. What’s hidden is the answer, until a license is entered.
In the answer window, a file you look up shows its name, “Locked” and the time it was created, with a line about the trial and the two buttons.
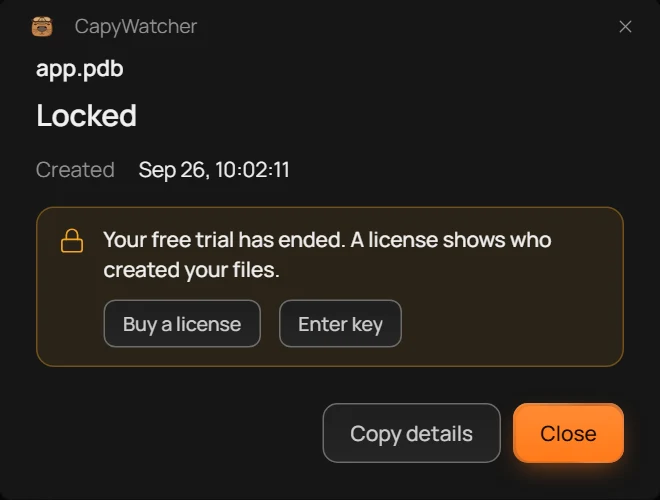
- Locked
- Buy a license and Enter key
In History, the files and their times stay, and the User, Process, Started by and PID columns say “Shows with a license”. A banner at the top offers the same two buttons. The License box says “Invalid (expired)”.
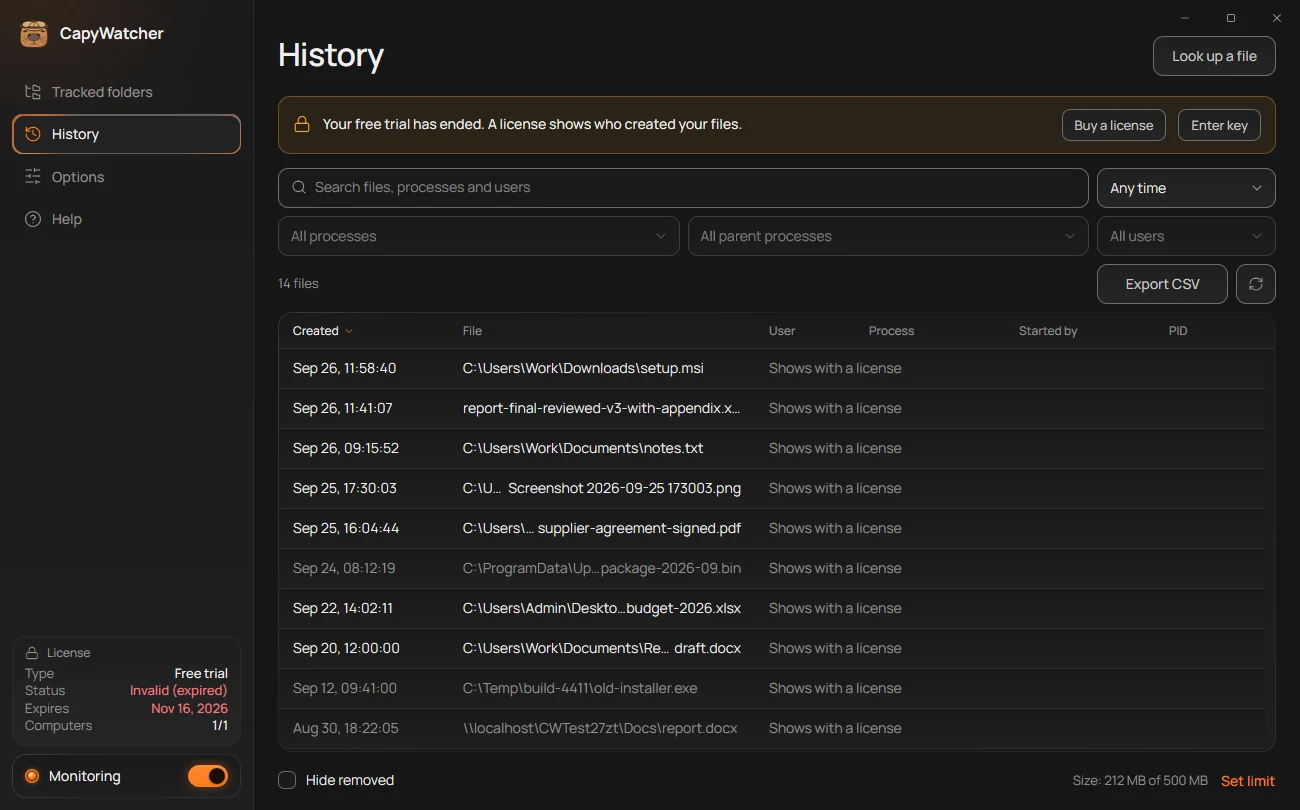
- The banner
- A hidden answer
An export of History holds only the File and Created columns while the answers are hidden: see Exporting history.
Get the answers back
- Select Buy a license, in the answer window, in History’s banner or in Help. The website’s pricing page opens, with the lifetime license and the Flexible plan.
- After you pay, your key shows on screen and arrives in the receipt email from Creem, the shop that sells the app’s licenses.
- Select Enter key, paste the key and select Activate: see Entering a license key.
Every answer shows again at once, those recorded during the trial and after it.
Important
Ending the trial never removes a record. Files created while monitoring was off, or in folders you didn’t track, have no record to show, with or without a license.
Entering a license key
A license key is 25 letters and digits, shown in five groups, such as XXXXX-XXXXX-XXXXX-XXXXX-XXXXX. You get it when you buy a license, and entering it in the app activates this computer.
Where your key is
- In the receipt email from Creem, the company that runs the app’s checkout. If you can’t find it, search your mailbox for Creem. The key is under View order.
- In Creem’s customer portal.
Lost both? The Lost your key? link in the app opens the website’s support page, which says what to do.
Enter your key
- Open the box for your key from any of these places:
- Enter key in Help, beside your license.
- Enter key in the banner that shows in History and in the answer window after the trial ends.
- Enter license key… in the menu of the app’s icon next to the clock.
- Paste your key in the field. Dashes and spaces don’t matter, and small letters work too.
- Select Activate.
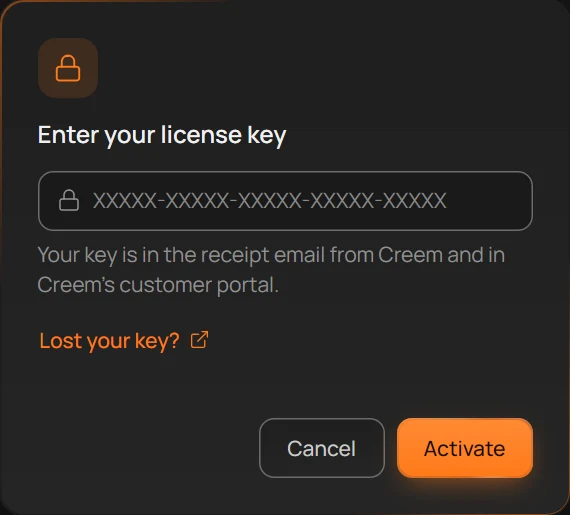
- The field
- Where your key is
- Lost your key?
- Activate
The button reads “Activating…” for a moment while the app asks the license server, then Help says “License active on this computer.” Every answer shows again, and the License box at the foot of the left column shows your license’s type and how many of its computers are in use.
To paste, press Ctrl+V in the field, or right-click it and select Paste.
When the key is refused
| The box says | What to do |
|---|---|
| “A license key has 25 letters and digits. Check that you copied all of it.” | Copy the whole key again from your receipt, and paste it. |
| “This key wasn’t found. Copy it again from your receipt email.” | A letter is wrong or missing. Copy it again rather than typing it. |
| “This key was replaced by a newer one, or refunded. Enter your newest key.” | Use the latest key you received. |
| “This key can’t be used anymore. Write to support by email or X DM.” | Write to support from the support page. |
| “Couldn’t reach the license server. Check your connection and try again.” | Activating needs the internet. Check the connection and try again. |
| “Couldn’t check the key because monitoring isn’t running. Turn on monitoring, then try again.” | The app’s service checks the key. Turn monitoring on, then try again. |
| “This key was activated on new computers too often this month. Try again on Dec 1, 2026, or write to support.” | Wait until the day it names, or write to support. |
When every computer of your key is already in use, the app says, for example, “This key is already active on 3 computers.” and “Remove one from one of those computers, or write to support for a new key.” Free a place on one of them as Your license and its computers shows, then select Activate again.
Installing on many computers with a key
IT staff can pass the key to setup, so a computer is activated as it installs. With the .msi, add LICENSEKEY= and the key to the install command. With the .exe, add /key and the key. Each computer activates the key by itself within a few minutes, and a computer that already has a license keeps it. A key in the wrong form is ignored, and the install goes on. The download page’s section on installing on many computers has the full commands.
Important
Activating sends the key and an ID made for this computer to the license server, never your files, folders or programs. Read the privacy policy for what the server keeps.