





This page takes you from the download to a working app: installing it, the first start, the main window, and turning monitoring off and on.
Installing
CapyWatcher installs like most Windows programs: you download one file, open it and select Install. Setup asks for an administrator’s permission once.
Before you start
The app needs Windows 11, or Windows 10 version 1803 or later, on a 64-bit computer. On an older Windows, setup stops at once with “This Windows is too old for CapyWatcher.” and installs nothing.
You also need an administrator’s permission. An administrator is an account allowed to change Windows for every account on the computer. On a computer of your own, your account usually is one. On a work computer, ask the person who looks after it.
Download the right file
The download page has two installers. Both put the same app on your computer.
- The .exe is for most people. It opens a setup window that walks you through the install.
- The .msi is for companies. Windows Installer and IT tools use it to install the app on many computers at once, with no window. The download page’s section on installing on many computers lists the commands.
The free trial starts the first time the app runs, with no card and no email.
Get past the Windows warning
When you open the installer, Windows may show a blue box, “Windows protected your PC”. Windows shows it because the installer isn’t signed yet: its code signing is waiting on Microsoft’s identity check, so Microsoft Defender SmartScreen doesn’t recognize it.
- Select More info.
- Check that the box names the file you downloaded, then select Run anyway.
- Windows asks whether to let the app make changes to your device. Select Yes.
The download page shows the same box step by step, with pictures.
Run setup
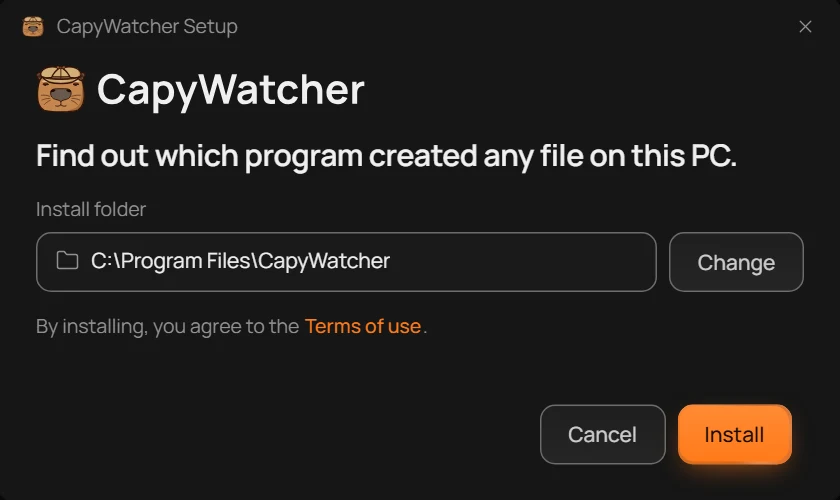
- Install folder
- Change
- Install
The setup window shows where the app goes, its Install folder (1), which is C:\Program Files\CapyWatcher unless you choose another one. To put it elsewhere, select Change (2) and pick a folder. Under it, a line links the terms of use, which you accept by installing.
Select Install (3). Windows asks for an administrator’s permission at this point, not before. If you refuse, setup stays open with “Setup needs administrator rights to install.” and you can select Install again.
While setup works, a bar shows each step by name: it backs up your settings, closes the app and its service if they run, copies the files, starts the service, adds the app to Explorer’s right-click menu and finishes. The service is the part of the app that keeps running in the background and records new files, even when the app’s window is closed.
Finish
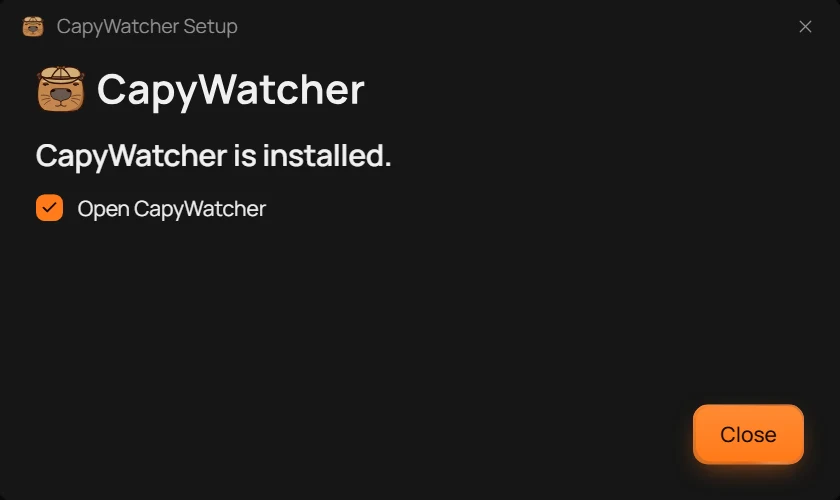
- Open CapyWatcher
- Close
When setup ends, it says “CapyWatcher is installed.” Leave Open CapyWatcher (1) checked and select Close (2), and the app opens. The first start page explains what to do there.
Update, repair or go back to an older version
Running an installer when the app is already there doesn’t install a second copy. Setup sees what’s on the computer and changes its button:
- A newer version than yours: the window says “Update from 1.1.7 to 1.1.8”, with your versions in place of those numbers, and the button reads Update. The install folder stays where it is.
- The same version: the window says “CapyWatcher 1.1.8 is installed.” and the button reads Repair, which puts the app’s files back as they should be.
- An older version than yours: setup asks “A newer version (1.1.8) is installed. Install 1.1.7 anyway?” Your settings stay as they are. Select Install anyway to go on, or Cancel.
Your settings and your history stay through an update or a repair, and setup keeps a copy of your settings before it changes anything.
If setup stops
When a step fails, setup names the step, as in “Setup stopped at: Copying files”, with Windows’ own message under it. If it could, it puts your previous version back and says so with “Your previous version was put back.” Select Copy details to copy what happened, then try again, or send it to support with the debug steps on the support page.
Important
The app records new files from the moment you choose the folders to track, never files that were there before you installed it.
The first start
The first time CapyWatcher opens, it records nothing yet. It waits for you to choose the folders it should watch, and one checked folder is enough to start.
What you see
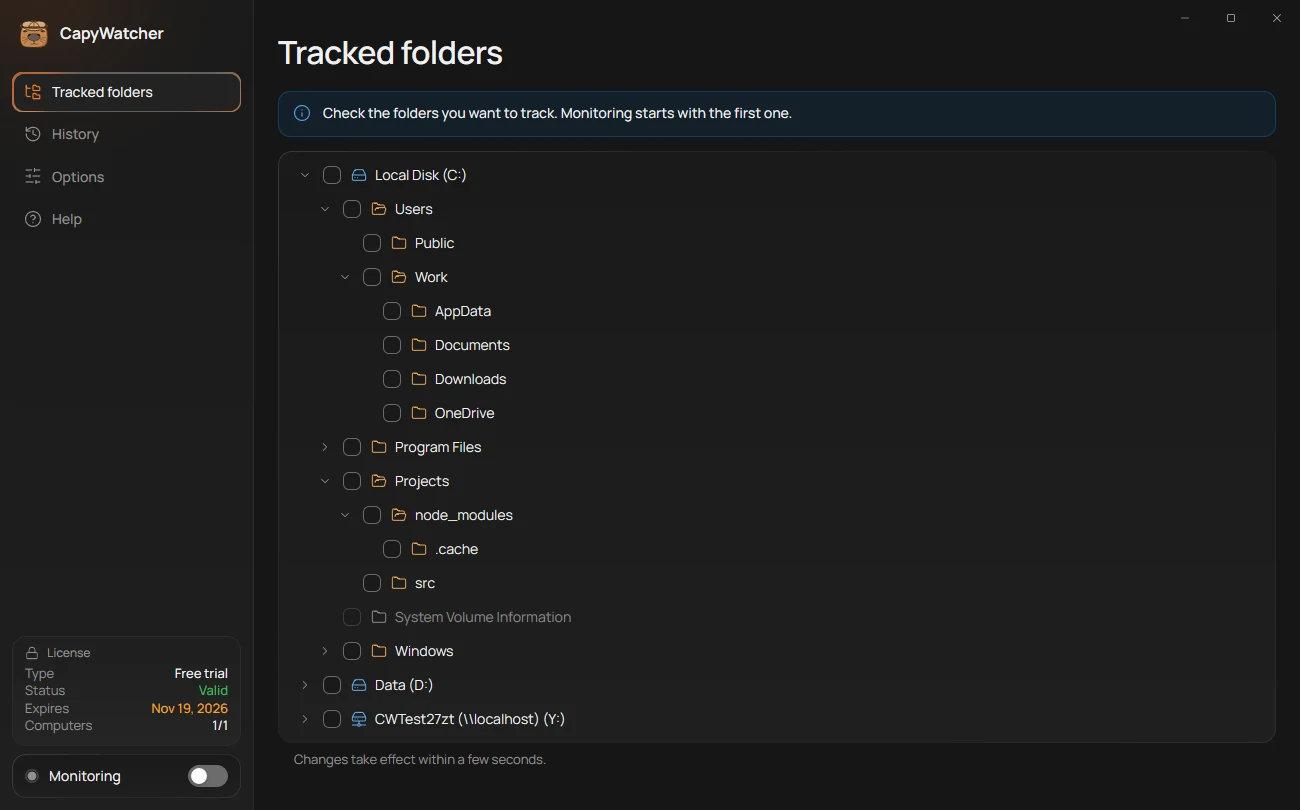
- The banner
- A folder’s checkbox
The app opens on Tracked folders. A banner (1) at the top says “Check the folders you want to track. Monitoring starts with the first one.” Under it, a tree lists your drives and the folders on them, all unchecked. Monitoring means the app’s service records the new files programs create in the folders you checked.
Check your first folder
- In the tree, select the arrow beside a drive or folder to open it and see the folders inside.
- Select the checkbox (2) of a folder you want to watch, such as
DocumentsorDownloads. - The banner changes to “Monitoring is on.” The Monitoring switch at the foot of the left column turns on, and the service records from that moment.
Checking a folder tracks everything inside it too, its subfolders included. Changes take effect within a few seconds.
Which folders to pick
Pick the folders where files appear that you want to explain: your Desktop, Downloads and Documents folders, or a project folder an AI agent or a build tool writes into. A whole drive works too, but it records far more, since Windows and your programs create files all over it.
You can change your choice whenever you like in Tracked folders, or from Explorer’s right-click menu with Track folder.
Your free trial
The free trial starts on the first start and lasts 7 days, with everything working. At the foot of the left column, the License box shows “Free trial” with the day it expires. Selecting the box opens Help, where you can enter a license key later.
What to do next
Wait for a program to create a file in a folder you checked, then right-click that file in Explorer. The page Who created this file? shows what the answer tells you.
To find your way around the app first, read the main window.
Important
The app records new files only, from the moment a folder is checked. A file that was already there, or that appeared before you installed the app, has no record, and its lookup says “Created before monitoring started”.
The main window
CapyWatcher’s window has one column on the left, which stays the same in every view, and the view you chose on the right.
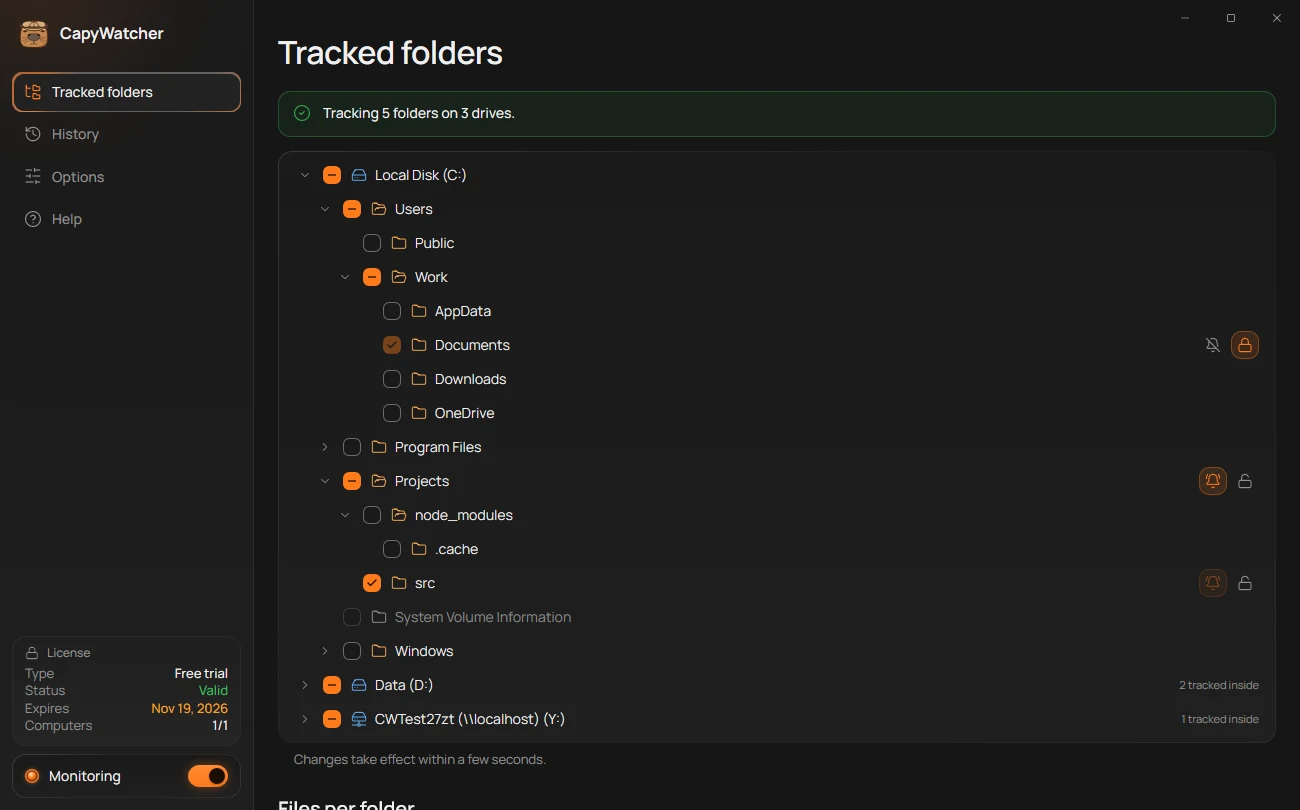
- Tracked folders
- History
- Options
- Help
- The License box
- The Monitoring switch
The four views
The left column lists the app’s four views. Select one to open it on the right.
- Tracked folders (1) is where you choose the folders the app watches, and where you turn on delete alerts or lock a folder. It’s the view the app opens on at the first start.
- History (2) lists every new file the app recorded in your tracked folders, with the program that created it. You can search and filter it and export it.
- Options (3) holds every setting: how long history is kept and how big it may grow, notifications, the theme and language, startup, updates and the settings backup.
- Help (4) has the links to the website and to support, the legal texts, the app’s version and your license.
The License box
At the foot of the left column, the License box (5) shows your license at a glance: its type (such as “Free trial”), its status, the day it expires and how many computers use it. Select the box to open Help, where your license is shown in full.
The Monitoring switch
The Monitoring switch (6) shows whether the app’s service records new files. The service is the part of the app that keeps running in the background, even when this window is closed. Turn the switch off to pause recording, and on to start it again. Turning monitoring off and on explains what stops while it’s off.
Closing the window
Closing the window with the X at its top right doesn’t end the app while the Close to tray option is on, as it is unless you turn it off in Options. The app keeps running in the tray, the row of small icons next to the clock on the taskbar, and you open it again from its icon there. With Close to tray off, closing the window ends the app. Recording goes on either way: the service records new files even when the app is closed. To stop recording, turn off monitoring instead.
Turning monitoring off and on
Monitoring is the app’s recording: while it’s on, the app’s service writes down every new file a program creates in your tracked folders, with the program that created it. The service is the part of CapyWatcher that runs in the background, even when the app’s window is closed.
Three places to turn it off and on
In the main window, the Monitoring switch sits at the foot of the left column. Turn it off to pause recording, and on to start it again.
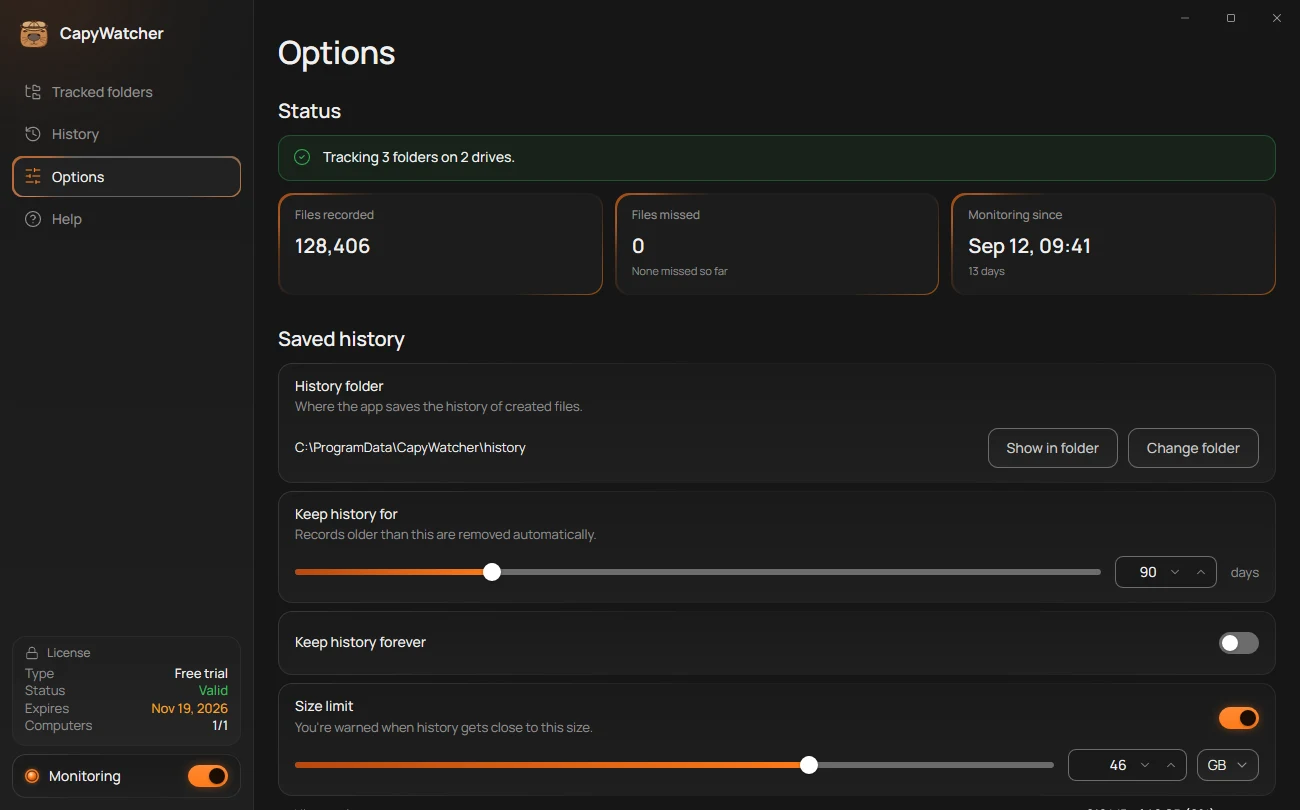
- The status line
- The Monitoring switch
In Options, under Status, the status line (1) says what monitoring does now. While it’s on, the line names how many folders the app tracks. While it’s off, it says “Monitoring is off.” with a Turn on monitoring button beside it. The Monitoring switch (2) is in the same window.
In the tray, right-click the app’s icon next to the clock. The tray is the row of small icons at the right of the taskbar, and its ^ button shows the icons Windows hides.
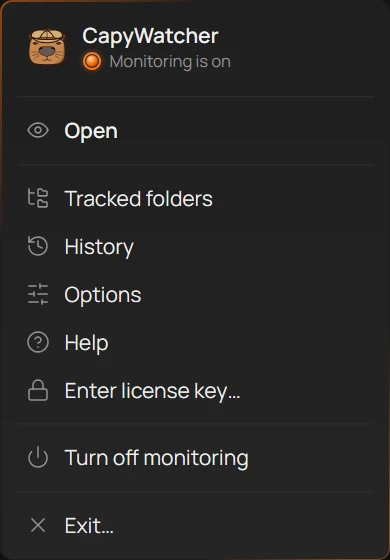
- The state
- Turn off monitoring
The menu shows the state at its top (1), and Turn off monitoring (2) pauses recording at once, with no question. While monitoring is off, the same item reads Turn on monitoring.
What stops while it’s off
- New files aren’t recorded. A file created in a tracked folder while monitoring is off never gets a record, even after you turn monitoring on again. Its lookup says “Not in history”.
- Delete alerts stop. The app doesn’t watch deletes while monitoring is off, so no “Files deleted in the Projects folder” notification comes for any folder.
- Locked folders stay locked. A lock is a permission Windows keeps on the folder, so it holds whether monitoring is on or off.
Everything already recorded stays in History, and you can still look up files.
Closing the app doesn’t stop recording
Closing the window, and even Exit in the tray’s menu, leaves monitoring on: the service goes on recording new files while the app is closed. What stops is the app’s notifications, delete alerts among them, until you open it again. To stop recording, turn off monitoring.
When it says Monitoring stopped
Sometimes the service stops without you turning monitoring off. The app then says “Monitoring stopped.” in Tracked folders, in Options and in the tray’s menu, and a notification says “New files aren’t recorded until it starts again.”
- Open Options or Tracked folders, or right-click the tray icon.
- Select Start: beside “Monitoring stopped.” in the window, or in the tray’s menu.
- The line changes back, and recording goes on from that moment.
If starting fails, the app says “Couldn’t start monitoring. Restart your computer and try again.” Restart the computer, then select Start again.
Important
Files created while monitoring was off or stopped are never recorded. The app records new files only, in the folders you track, while monitoring is on.